User Guide

Table of Contents
- Table of Contents
- Introduction
- What is TeachBook?
- How to use this guide?
- Quick Start
- Graphical User Interface
- Features
- FAQs
- Command Summary
Introduction
Welcome to the TeachBook User Guide!
If you are a primary or secondary school teacher who is using TeachBook, or just someone who wants to find out more about what TeachBook can do, you are at the right place.
In this user guide, you will find step-by-step instructions on how you can install TeachBook and a guide on how to use all of its features.
What is TeachBook?
TeachBook is a desktop app for primary and secondary school teachers to manage student contacts, optimized for use via a Command Line Interface (CLI) while still having the benefits of a Graphical User Interface (GUI). It is targeted towards teachers who can type fast. It allows teachers to store and organise contacts related to their students into different classes.
How to use this guide?
As this user guide is created for users with varying levels of experience using the app, it is divided into different sections, so feel free to navigate to the portion of interest using our handy Table of Contents provided above.
-
If you are a new user who is using TeachBook for the first time, you can follow the Quick Start on how to get TeachBook running on your system for the first time.
-
If you are an intermediate user who is facing some issues with TeachBook, you can go to the FAQs section to see if your issues have already been addressed. If not, feel free to reach out to us, and we will respond promptly.
-
If you are an experienced user who can’t remember the extensive list of features that TeachBook provides, you can jump to the Command Summary section or the Features section if you want to find out more.
There are 3 symbols that you need to know in order to use this user guide effectively, and they are ![]() ,
,
![]() and
and ![]() . Refer to the table below for more information.
. Refer to the table below for more information.
| Symbol | Meaning |
|---|---|
| additional information that we feel that you ought to know | |
| a tip (e.g. shortcut or hidden features) which you can follow to enhance your experience using TeachBook | |
| a caution you have to take to prevent any unwanted results |
Quick Start
-
Ensure you have Java
11or above installed on your computer. -
Download the latest
TeachBook-v1.4.0.jarfrom here. -
Copy the file to the folder you want to use as the home folder for your TeachBook.
-
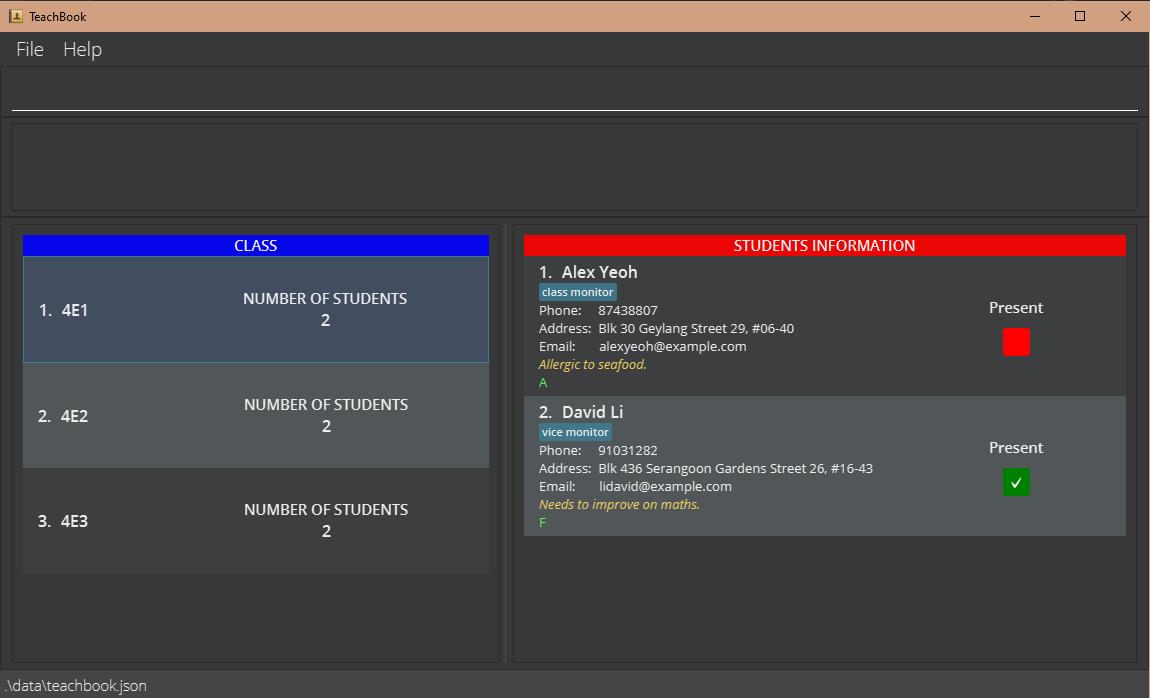
Double-click the file to start the app. The GUI similar to the below should appear in a few seconds. Note how the app contains some sample data.
-
Type the command in the command box and press
Enterto execute it. For example, typinghelpand pressingEnterwill open the help window.Some example commands you can try:
-
select4E2: Displays all the students from the class named4E2. -
delete2: Deletes the 2nd student shown in the list on the right. -
addClass4E4: Adds a new class named4E4to the TeachBook. -
clear: Clears all existing data. -
exit: Exits the app.
-
-
Refer to the Features below for details of each command.
Graphical User Interface
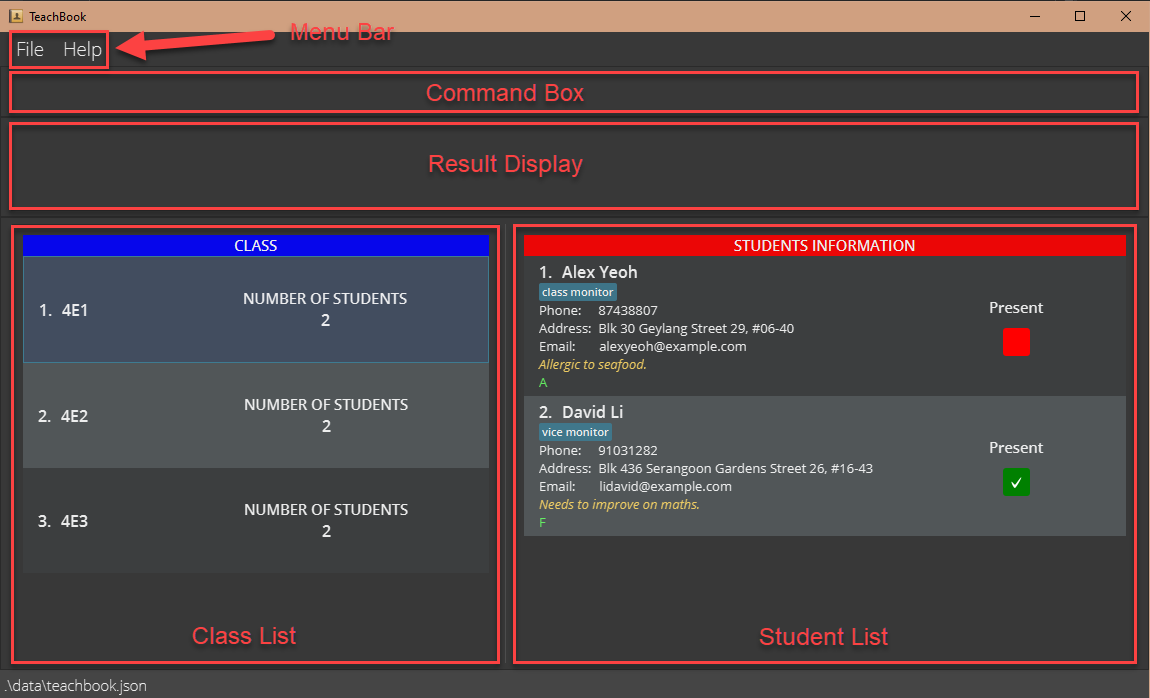
In this section, we will be guiding you through the different sections of TeachBook’s Graphical User Interface (GUI). There are a total of 5 different sections according to the image of our GUI below (highlighted in red) and they are the:
- Menu Bar
- Command Box (Place for you to type in the command)
- Result Display (Place where the result of the command will be displayed)
- Class List (Place where you can see the list of classes that you have added)
- Student List (Place where you can see the list of students that you have added)
Features
![]() Notes about the command format:
Notes about the command format:
-
Words in
UPPER_CASEare the parameters to be supplied by the user.
e.g. inadd n/NAME,NAMEis a parameter that can be used asadd n/Jane Doe. -
The parameter
INDEXrefers to the index number currently shown in the student list, and it must be a positive integer 1, 2, 3, … -
Items in square brackets are optional.
e.g.n/NAME [t/TAG]can be used asn/Joseph Chan t/class monitoror asn/Joseph Chan. -
Items in square brackets with
…after them can be used multiple times including zero times.
e.g.[t/TAG]…can be used ast/friend,t/friend t/familyetc. -
Items outside square brackets with
…after them can be used multiple times but at least once.
e.g.INDEX…can be used as1,2 3,1 4 5 9etc. -
Items separated by
||means only one of the partitioned items should be supplied.
e.g.sort name||gradecan be used as eithersort nameorsort grade, but notsort name grade. -
If a command accepts more than one parameter (i.e. word in
UPPER_CASE), parameters can be in any order. However, this does not apply to the parameterINDEX, which should always be specified before others.
e.g. if the command specifiesn/NAME p/PHONE_NUMBER,p/PHONE_NUMBER n/NAMEis also acceptable. -
If a parameter is expected only once in the command, but you specified it multiple times, only the last occurrence of the parameter will be taken.
e.g. if you specifyp/12341234 p/56785678, onlyp/56785678will be taken. -
Extraneous parameters for commands that do not take in parameters (such as
help,exit, andclear) will be ignored.
e.g. if the command specifieshelp 123, it will be interpreted ashelp.
Basic features
Viewing help : help
You can use this command to get a link back to this user guide whenever you are in need of assistance.
Format: help
 Fig 1: Help window popup when
 help command is executed
Clearing all entries : clear
You can use this command to delete all classes and students, and reset the grading system of the TeachBook, giving you a fresh TeachBook to work with.
Format: clear
Undoing a command : undo
You can use this command to revert the TeachBook to the previous state. You most likely will be using this command if you have made a mistake.
Format: undo
![]() Info:
Info:
- If a command executed results in an error message, nothing in the TeachBook will change, hence you do not have to undo it.
- Commands that do not cause any changes in data or display cannot be undone (e.g.
print,help, etc.).
Redoing a command: redo
You can use this command to redo a command after using an undo command if you undid it accidentally.
Format: redo
Exiting the program : exit
You can use this command to exit TeachBook. There is no need to save any data manually.
Format: exit
Class related features
Adding a class : addClass
You can use this command to add a new class into TeachBook. After this, you can start organising the class by adding students inside.
Format: addClass CLASS_NAME
- Adds the class with the specified
CLASS_NAME. - The
CLASS_NAMEis case and space sensitive and should not be already inside the TeachBook.
Examples:
-
addClass 4E4adds a class named4E4into the TeachBook.
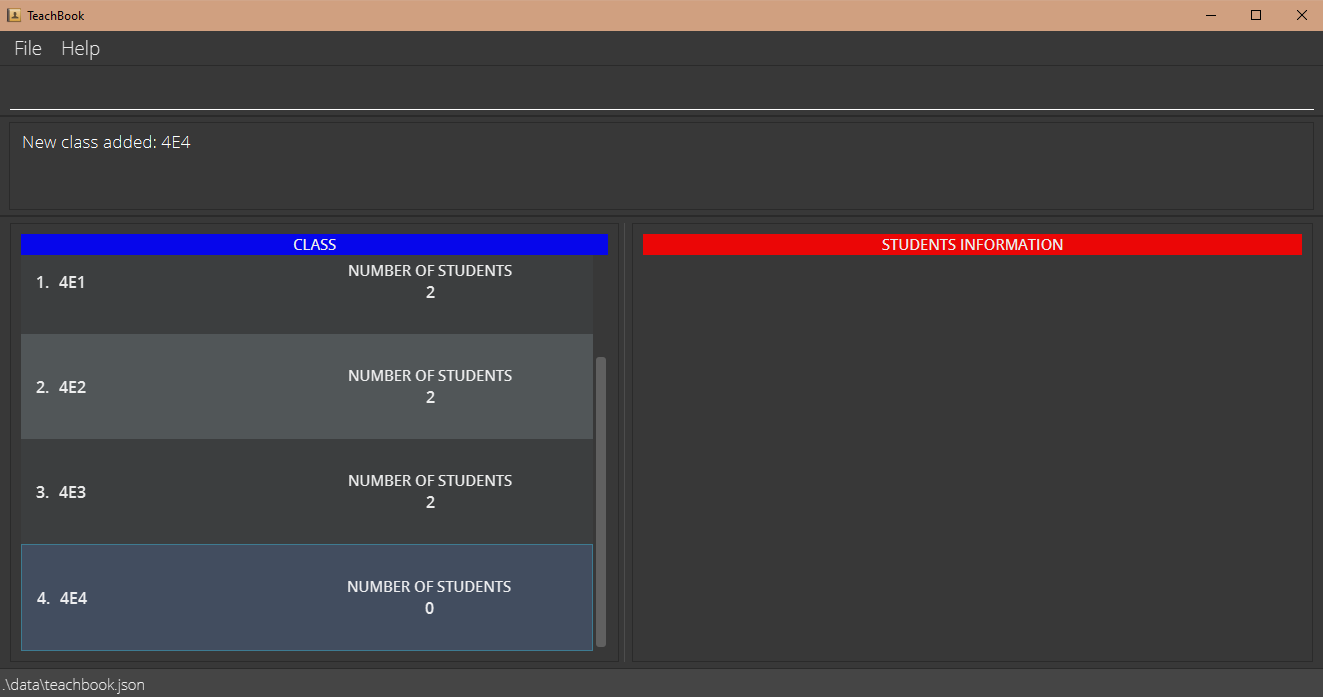 Fig 2: Class
 4E4 is added after addClass 4E4 is executed
Deleting a class : deleteClass
You can use this command to delete a class currently in TeachBook. All the students in the class will also be deleted. With this command, you can easily delete a whole class without the need to delete individual students.
Format: deleteClass CLASS_NAME
- Deletes the class with the specified
CLASS_NAME. - The
CLASS_NAMEis case and space sensitive and should be inside the TeachBook.
Examples:
-
deleteClass 4E4deletes the class named4E4from the TeachBook.
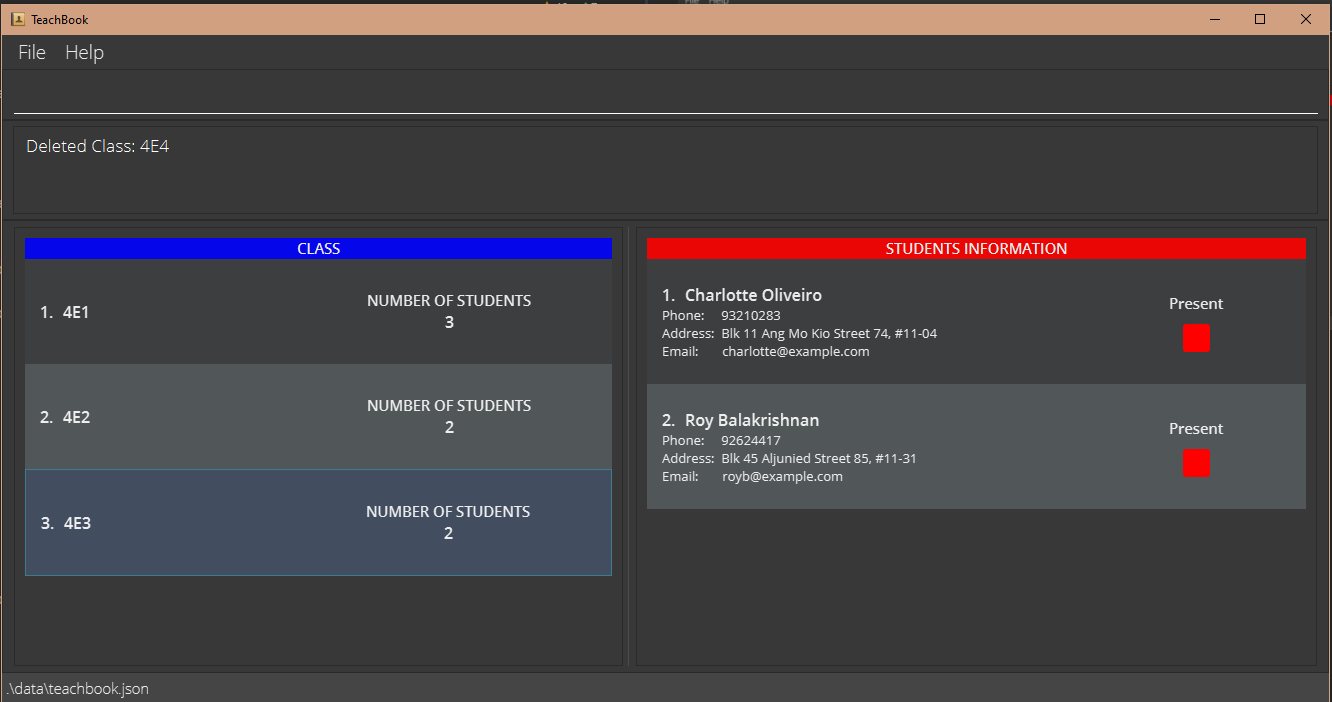 Fig 3: Class
 4E4 added in addClass is deleted after deleteClass 4E4 is executed
Selecting a class : select
You can use this command to navigate to a class so that you can view students in that class.
Format: select CLASS_NAME
- Navigates to the class with the specified
CLASS_NAME. - The
CLASS_NAMEis case and space sensitive and should be inside the TeachBook.
Example:
-
select 4E2selects the class named4E2in the TeachBook.
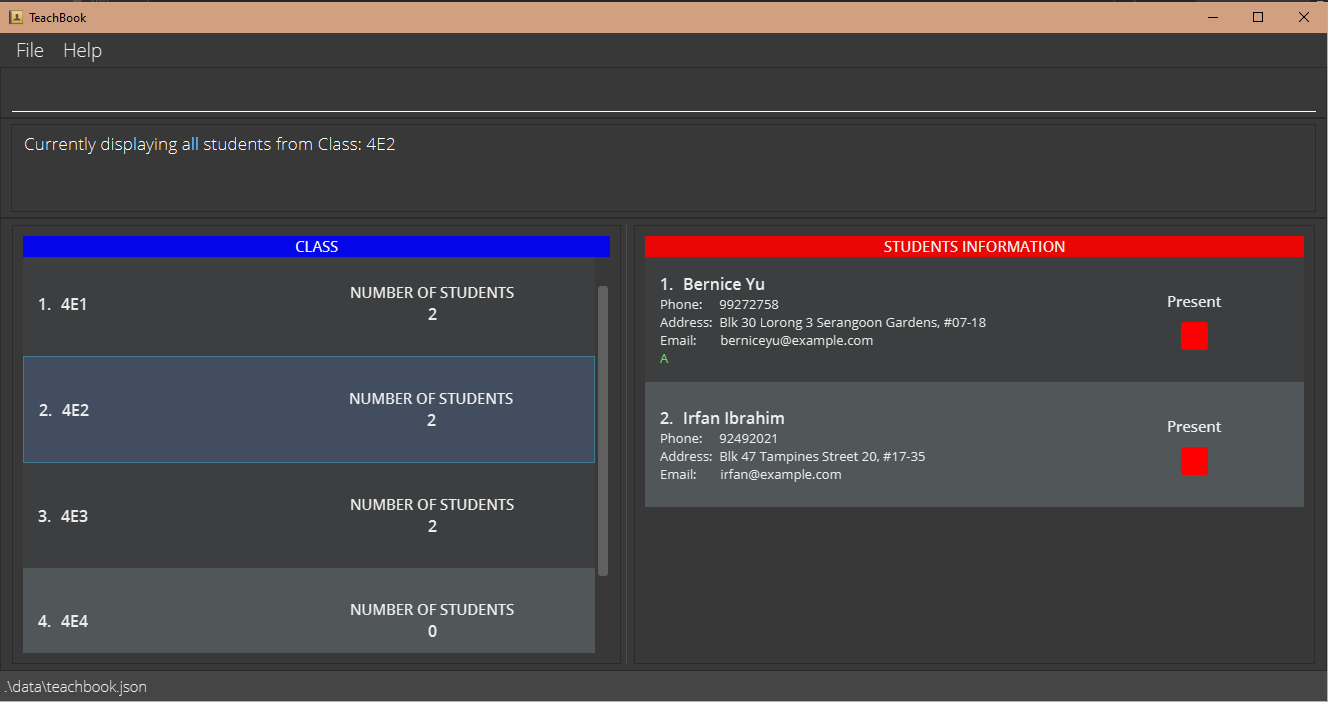 Fig 5: Class
 4E2 is highlighted in blue with its students list displayed after select 4E2 is executed
Editing a class name : editClass
You can use this command to make changes to the class name of the currently selected class, if you have made a spelling mistake or if you just want to change the class name.
Format: editClass CLASS_NAME
- Edits the name of the currently selected class to the specified
CLASS_NAME - The
CLASS_NAMEis case and space sensitive and should not be already inside the TeachBook.
Examples:
-
editClass 4E5edits the name of the currently selected class to be4E5.
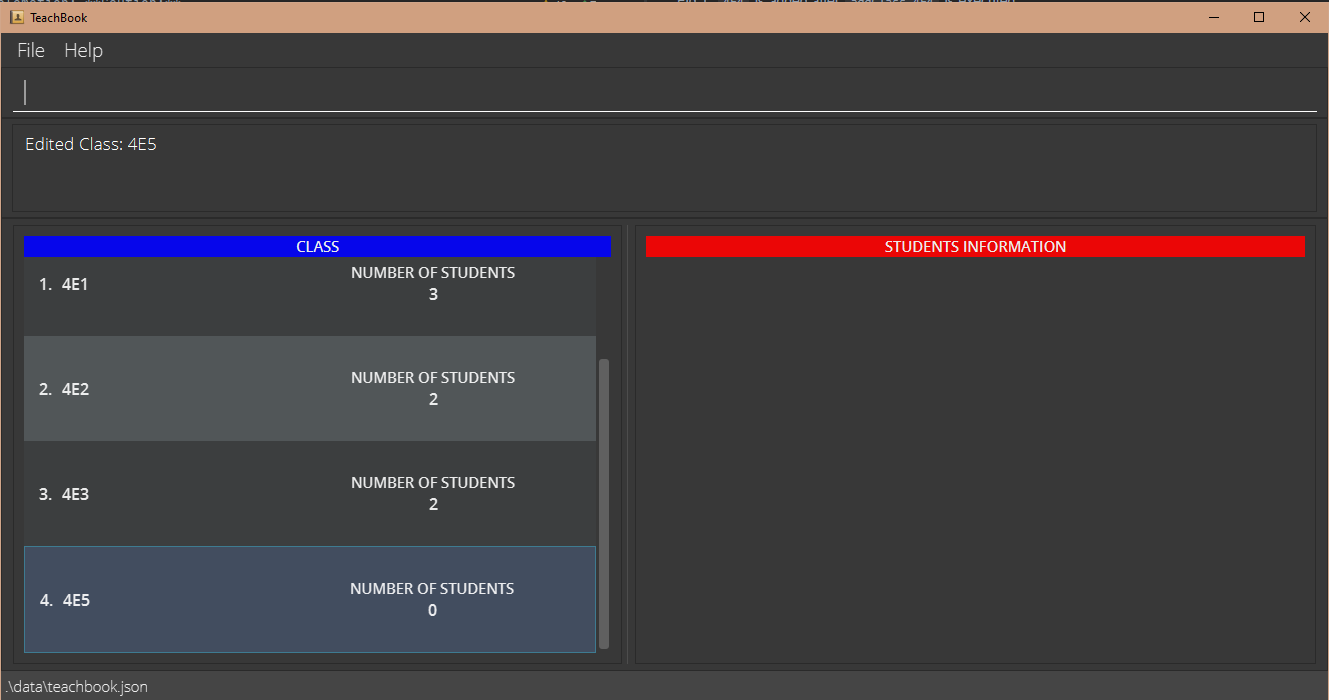 Fig 4: Class
 4E4 added in addClass is now named 4E5 after editClass 4E5 is executed
Student related features
Adding a student : add
You can use this command to add a new student to the currently selected class so that you can start storing contacts.
Format: add n/NAME [p/PHONE_NUMBER] [e/EMAIL] [a/ADDRESS] [t/TAG]…
- A class should be selected before adding a student.
- Everything is optional except for the name of the student.
- The
NAMEis case and space sensitive and should not be already inside the class. - You can add multiple tags by adding more
t/flags.
Examples:
-
add n/John Doeadds a student named John Doe into the currently selected class. -
add n/Jane Doe p/91234567 e/janedoe@example.com a/21 Lower Kent Ridge Road, Singapore 119077 t/class monitoradds contact information of Jane Doe with all the optional information into the currently selected class.
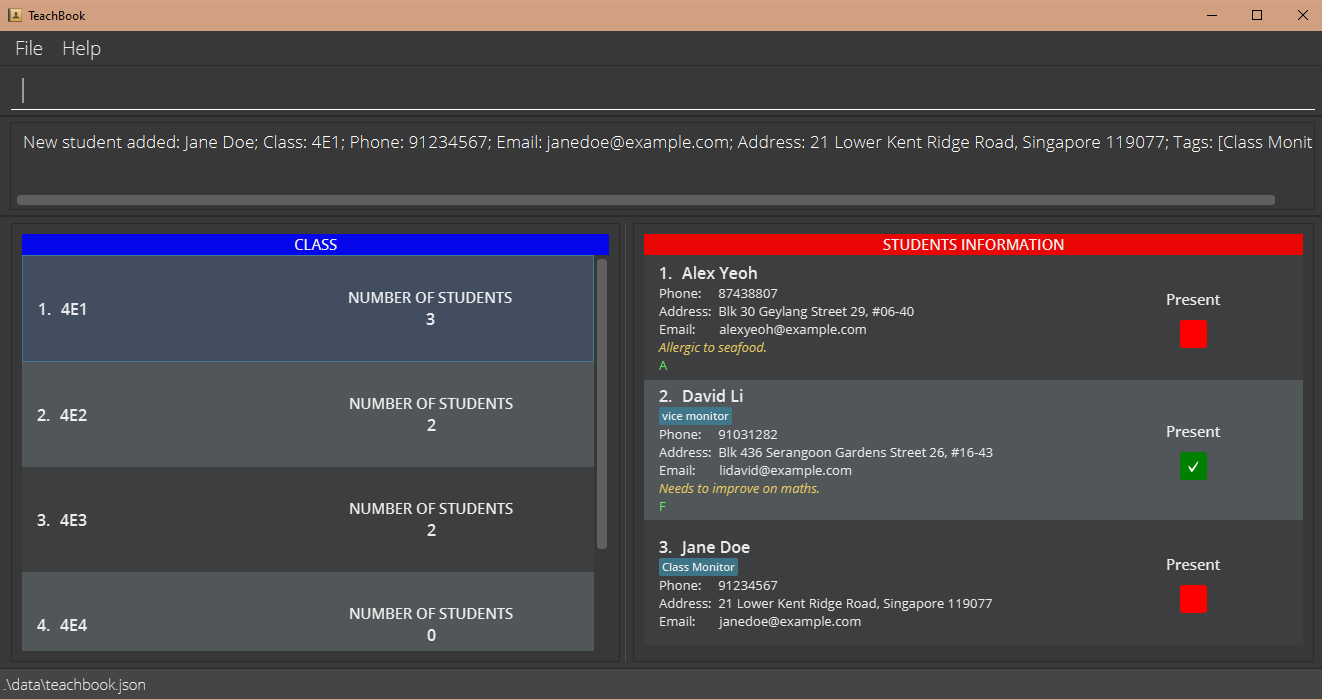 Fig 6: Student
 Jane Doe is added into Class 4E1 after the second example command above is executed
Deleting a student : delete
You can use this command to remove the student from the TeachBook, if you have added a student to the wrong class or when the student is no longer in the class.
Format: delete INDEX…||all
-
delete INDEX…deletes the students at the specifiedINDEXs. -
delete alldeletes all the students currently displayed in the student list.
Examples:
-
list allfollowed bydelete 2 3deletes the 2nd and 3rd students in the TeachBook. -
find Johnfollowed bydelete 1deletes the 1st student in the results of thefindcommand. -
select 4E2followed bydelete alldeletes all the students in class4E2.
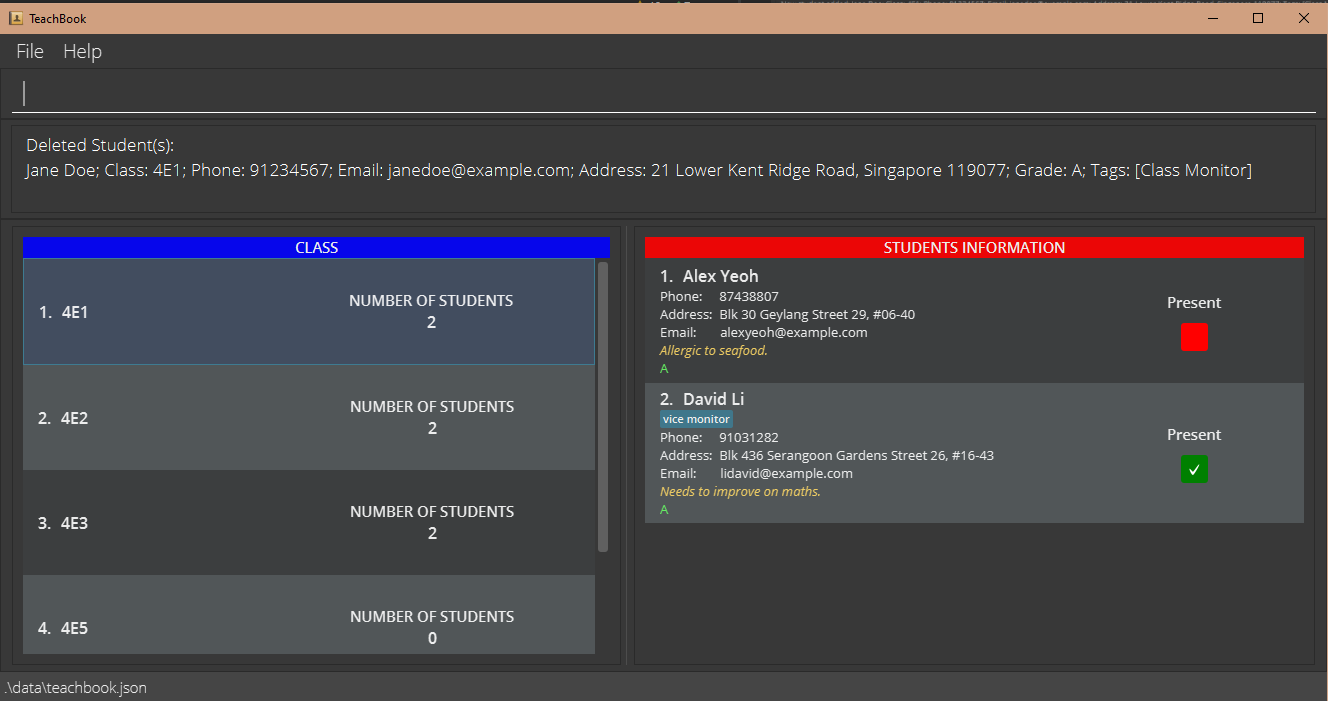 Fig 7: Student
 Jane Doe added in add is removed from Class 4E1 after delete 3 is executed
Editing a student : edit
You can use this command to edit students’ information at any time if there are any changes.
Format: edit INDEX [n/NAME] [p/PHONE_NUMBER] [e/EMAIL] [a/ADDRESS] [t/TAG]…
- Edits the information of the student at the specified
INDEX. - At least one field to edit must be specified.
- Existing values will be overwritten by input values.
1 are class monitor and excellent grade, calling edit 1 t/allergic to seafood
will clear the original tags class monitor and excellent grade, resulting in the student having only one tag allergic to seafood.
Examples:
-
edit 1 p/91234567 e/johndoe@example.comedits the phone number and email address of the 1st student shown in the list to be91234567andjohndoe@example.comrespectively. -
edit 3 n/Joseph Chan t/edits the name of the 3rd student shown in the list to beJoseph Chanand clears all existing tags.
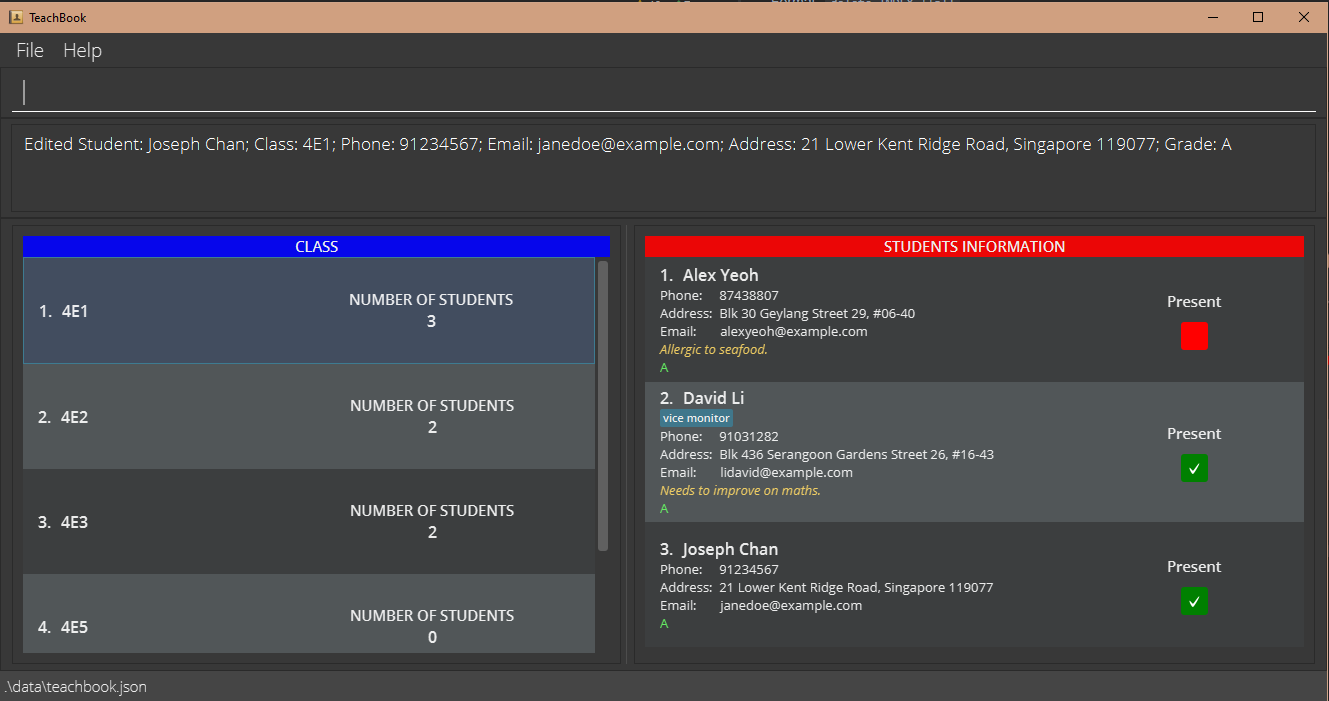 Fig 8: Student
 Jane Doe added in add, has been renamed to Joseph Chan with no tags after edit 3 n/Joseph Chan t/ is executed
Locating students by name : find
You can use this command to search for students with the specified keywords in their names, instead of scrolling through the whole list of students to find a specific student which is often time-consuming.
Format: find KEYWORD…
- The search is case-insensitive e.g.
john,JOHNorJoHnwill matchJohn. - The order of the keywords does not matter e.g.
Doe Johnwill matchJohn Doe. - Only the name is searched.
- Only full words will be matched e.g.
Johnwill not matchJohnny. - Students matching at least one keyword will be listed (i.e. OR search) e.g.
find John Doewill returnJohn Deer,Jane Doe.
Examples:
-
find Jane Doereturns only oneJane Doefrom the currently selected class, even if there is anotherJane Doefrom a different class. -
list allfollowed byfind John Doereturns twoJohn Doe, assuming that there are twoJohn Doein the entire TeachBook from different classes.
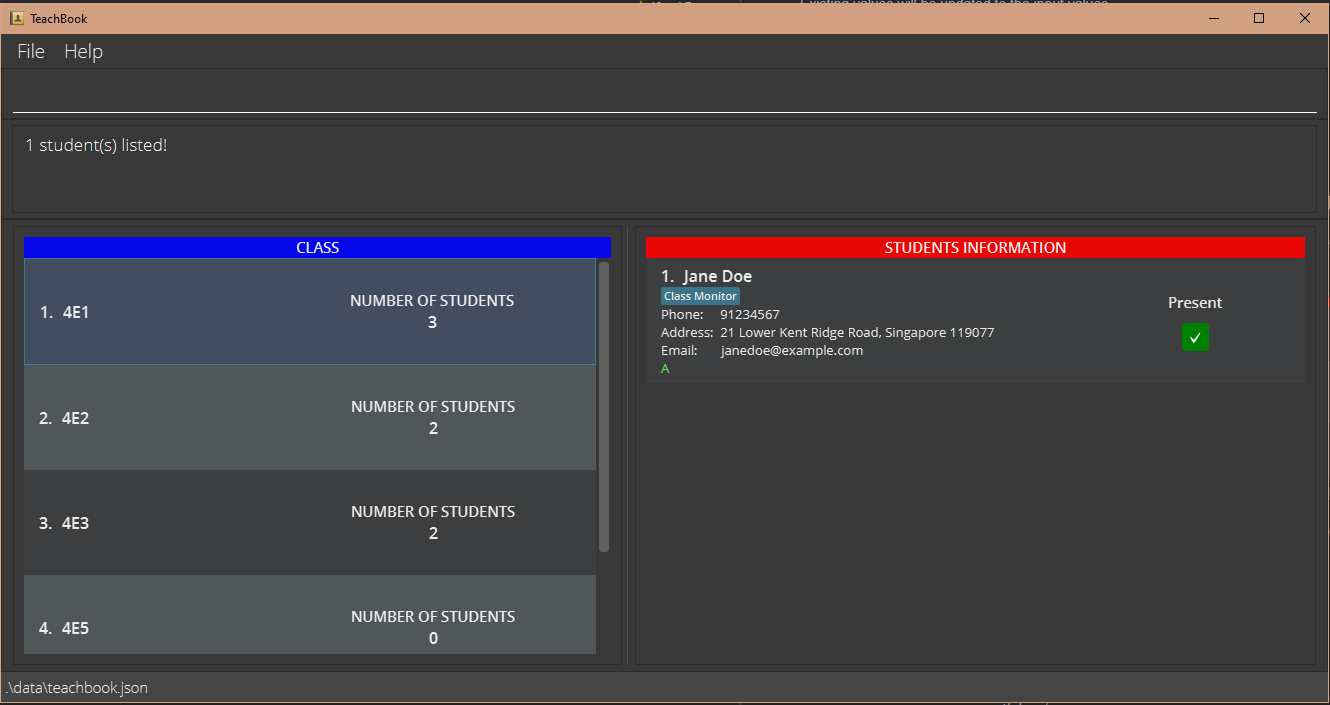 Fig 9: Student
 Jane Doe added in add is displayed in the student list after find Jane Doe is executed
Adding remark to a student : remark
You can use this command to add any special notes to your students.
Format: remark INDEX r/[REMARK]
- Adds the specified
REMARKto the student at the specifiedINDEX.
Example:
-
remark 3 r/Contracted COVID-19adds a remark to the 3rd student that he/she has contracted COVID-19. -
remark 1 r/clears previously added remark of the 1st student.
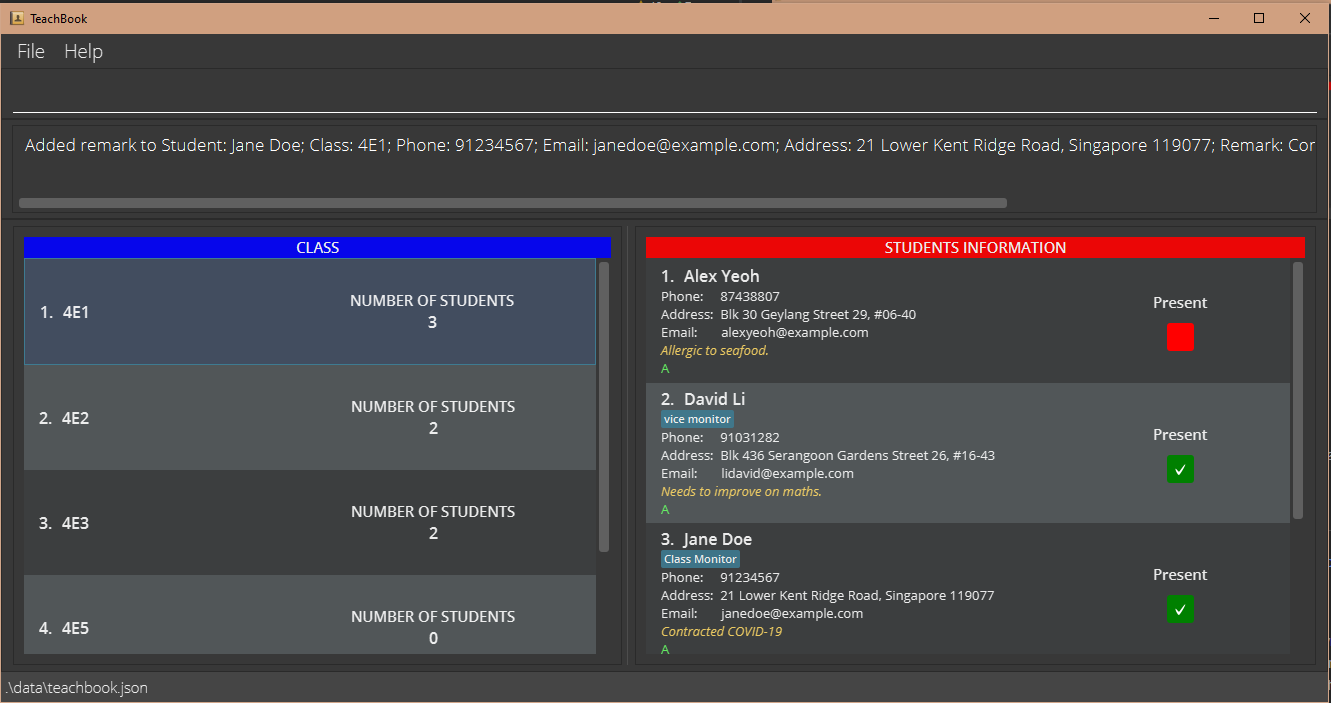 Fig 10: Student
 Jane Doe added in add is displayed with remark Contracted COVID-19 after remark 3 r/Contracted COVID-19 is executed
Grade related features
Setting a grading system : setGrade
You can use this command to implement your own grading system as grading systems might differ as the semester/subject changes, in order to grade your students accordingly.
Format: setGrade GRADE_1[>GRADE_2]…
- Grades are set in descending order, from the highest to the lowest grade, separated by
>.
Example:
-
setGrade A>B>C>Dsets the grading system whereAis the highest grade andDis the lowest grade.

Fig 11: New grading system is set after setGrade A>B>C>D is executed
Giving grade to a student : grade
You can use this command to assign grades to your students.
Format: grade INDEX…||all g/[GRADE]
- A grading system should already exist in the TeachBook.
-
GRADEmust be from the previously set grading system. -
grade INDEX… g/GRADEgives the specifiedGRADEto the students at the specifiedINDEXs. -
grade all g/GRADEgives the specifiedGRADEto all the students currently displayed in the student list.
Example:
-
grade 1 g/Bgives the 1st student aBgrade. -
grade 2 4 5 g/Agives the 2nd, 4th, and 5th students anAgrade. -
grade all g/Agives anAgrade to all the students currently displayed in the student list. -
grade 1 g/clears any grade of the 1st student.
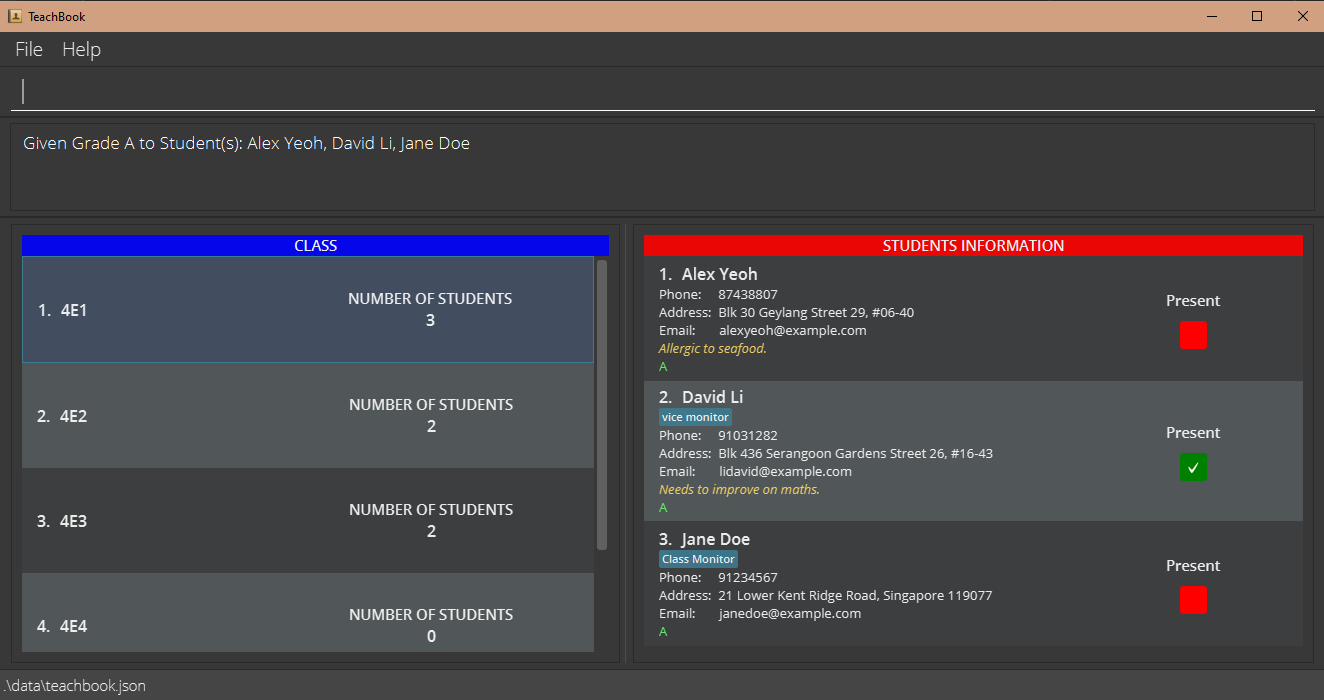 Fig 12: All students in Class
 4E1 are given an A grade after grade all g/A is executed
Resetting grading system : resetGrade
You can use this command to wipe out an existing grading system before setting a new one, because TeachBook can only incorporate at most 1 grading system at any time.
Format: resetGrade
Attendance related features
Marking the attendance of a student : mark
You can use this command to mark your students as present. The present checkbox will turn green with a tick indicating successful marking of attendance.
Format: mark INDEX…||all
-
mark INDEX…marks the students at the specifiedINDEXs present. -
mark allmarks all the students currently displayed in the student list present.
![]() Info:
This command will result in all the students in the list being shown. For example, if you execute
Info:
This command will result in all the students in the list being shown. For example, if you execute list absent to filter out all absent students
and want to mark attendance one by one, it may not work as expected because, after every mark, the list will no longer contain all absent students.
As a result, we recommend marking the attendance of multiple students at once.
print c/attendance command. You might also want to check out the print command for more columns available to be added.
Examples:
-
mark 3marks the 3rd student present. -
mark 2 3 4marks the 2nd, 3rd, and 4th students as present. -
mark allmarks all the students currently displayed in the student list present.
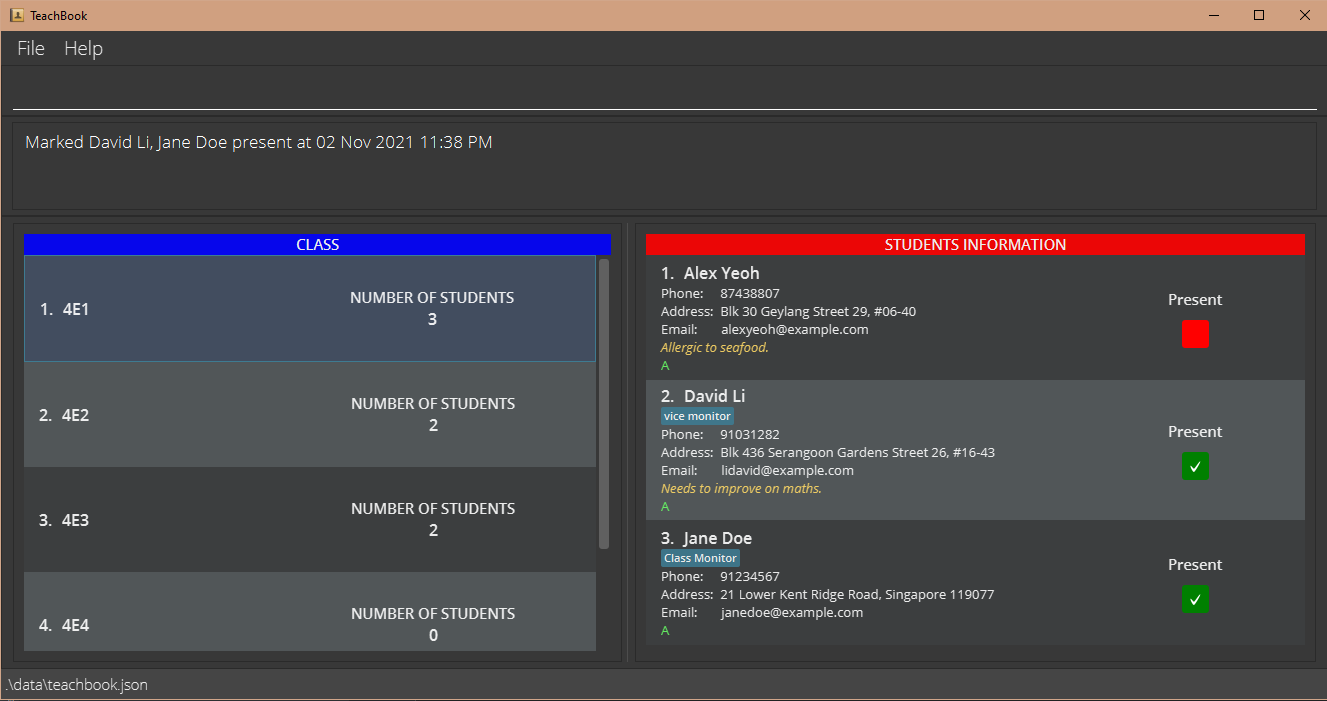 Fig 13: Student
 Jane Doe added in add is displayed with a green checkbox with a tick after mark 3 is executed
Un-marking the attendance of a student : unmark
You can use this command to mark your students as absent. The present checkbox will turn red indicating successful un-marking of attendance.
Format: unmark INDEX…||all
-
unmark INDEX…marks the students at the specifiedINDEXs as absent. -
unmark allmarks all the students currently displayed in the student list as absent.
list followed by unmark all to clear the attendance of all students.
Examples:
-
unmark 3marks the 3rd student as absent. -
unmark 2 3 4marks the 2nd, 3rd, and 4th students as absent. -
unmark allmarks all the students currently displayed in the student list as absent.
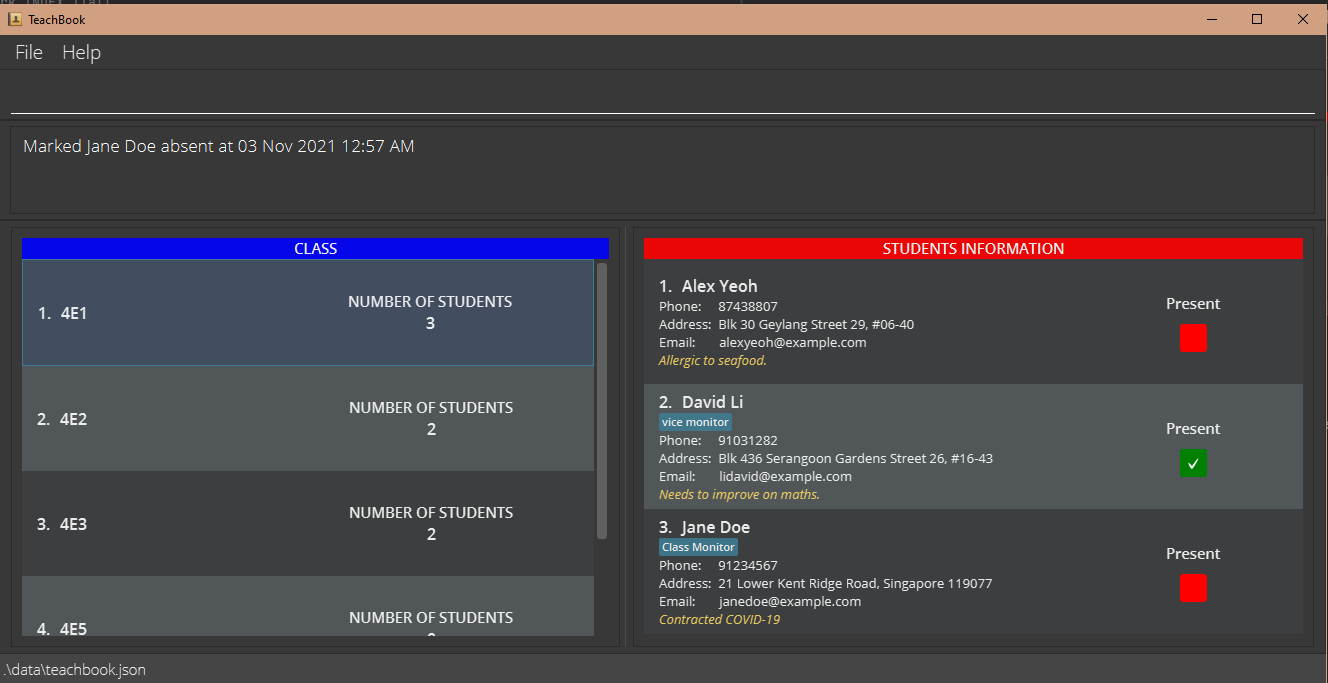 Fig 14: Student
 Jane Doe, who was previously marked as present, is now marked as absent and is displayed with a red checkbox after unmark 3 is executed
Utility features
Printing to Excel : print
You can use this command to generate an Excel (.xls) file containing students in the student list currently displayed with customized columns.
Format: print [c/class] [c/phone] [c/email] [c/address] [c/tags] [c/remark] [c/attendance] [c/grade] [c/COLUMN_TITLE]…
- The first column always consists of the names of the students.
- Columns with special names as in the format will be populated with the respective information of the students.
- You can add one or more empty columns with the specified
COLUMN_TITLEs.
![]() Info:
Putting an empty column title (i.e.
Info:
Putting an empty column title (i.e. c/ ) will give you an empty column.
Examples:
-
print c/class c/email c/Signaturecreates an Excel file with four columns: student name column, class column, email column, and an empty column with titleSignature. Fig 15: Excel sheet generated from TeachBook after
 print c/class c/email c/Signatureis executed
Sorting students : sort
You can use this command to sort the student list according to either their name or grade because an unorganized student list is a pain to see.
Format: sort name||grade
-
sort namereorders students according to their name. -
sort gradereorders students according to their grade in descending order. - Sorting by grade requires a grading system to be in place in the TeachBook.
![]() Info:
Info:
- When there is a currently selected class,
sortwill sort the entire student list of the class, not just the displayed student list. -
sortfollowed bylist allwill not sort individual class’s student list.
Examples:
-
select 4E2followed bysort namesorts the students in class4E2according to their name. -
list allfollowed bysort gradesorts all the students in the TeachBook according to their grade but will not reorder each class’s student list.
Listing all students : list
You can use this command to list all the (absent) students from the currently selected class or the entire TeachBook.
Format: list [all||absent]
-
listshows all the students in the current student list. -
list alllists all the students from all the classes. -
list absentlists all the students in the current student list whose attendance status is unmarked. - When students from different classes are shown, each student’s class is displayed in the top right corner of the student.
list all should be interpreted as a way to unselect the currently selected class. Therefore, in order to view the original list after calling
list all followed by other commands like list absent, list all won’t take you back to the original list, you should not use list all
as there is already no class selected. Instead, the list command should be used to take you back to the original
list by listing out all the students from all the classes as no class is selected.
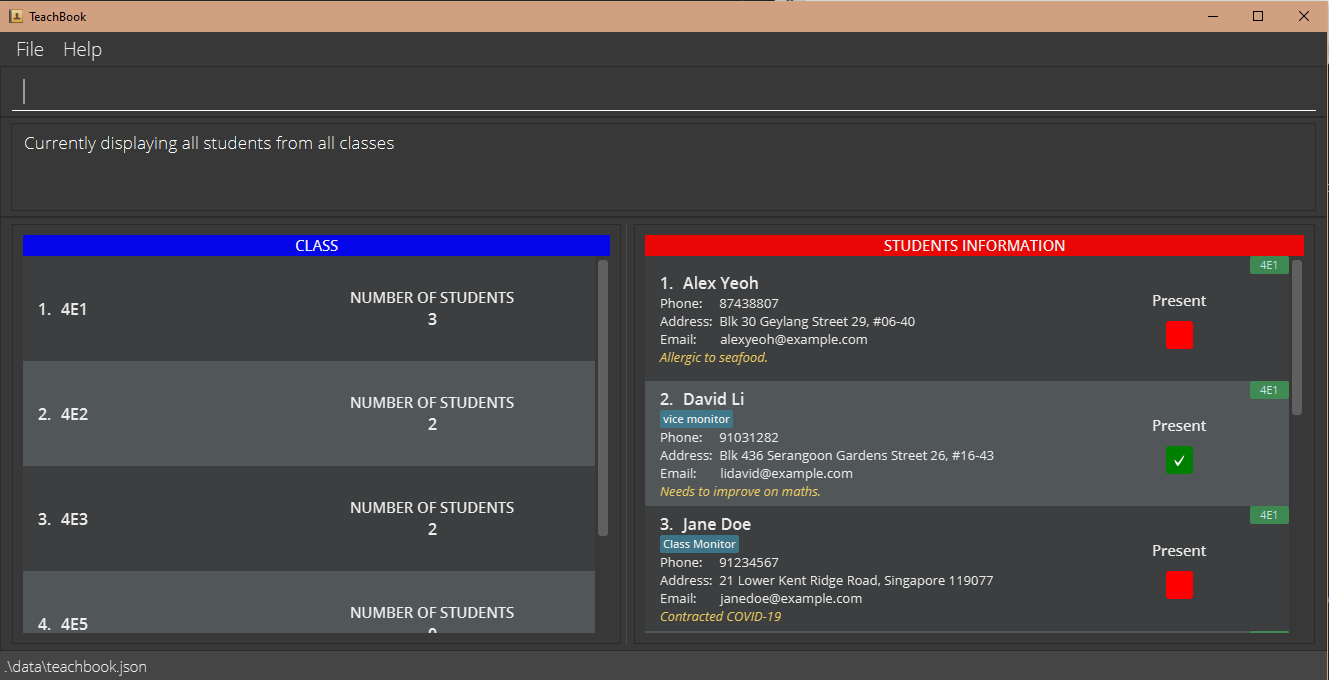 Fig 16: All students in the TeachBook are displayed after
 list all is executed
Others
Saving the data
TeachBook data are saved in the hard disk automatically after any command that changes the data. There is no need to save manually.
Editing the data file
TeachBook data are saved as a JSON file [JAR file location]/data/teachbook.json. Advanced users are welcome to update data directly by editing that data file.
FAQs
Q: How do I transfer my data to another computer?
A: Install the app on the other computer and overwrite the empty data file it creates with the file that contains the data of your previous TeachBook.
Q: Where does the Excel file save to after using the print command?
A: It will be saved to your computer’s download folder. A detailed file path is also given in the command result after the print command is executed.
Q: There seems to be a lag after some commands. What can I do?
A: Close any background programs or applications which are not in use on your computer.
Q: When performing tasks on classes (e.g. deleting or selecting a class), I find it cumbersome to type the class name all the time. Can I select it by the index?
A: Currently, it is still not possible. We have heard your feedback and are currently working on it to add this feature in. Do keep a lookout for our next update!
Command Summary
| Action | Format, Examples |
|---|---|
| Help | help |
| Clear all data | clear |
| Undo previous command | undo |
| Redo previous command | redo |
| Exit | exit |
| Add class |
addClass CLASS_NAME e.g., addClass 4E4
|
| Delete class |
deleteClass CLASS_NAME e.g., deleteClass 4E4
|
| Select class |
select CLASS_NAME e.g., select 4E2
|
| Edit class |
editClass CLASS_NAME e.g., editClass 4E5
|
| Add student |
add n/NAME [p/PHONE_NUMBER] [e/EMAIL] [a/ADDRESS] [t/TAG]… e.g., add n/Jane Doe p/91234567 e/janedoe@example.com a/21 Lower Kent Ridge Road, Singapore 119077 t/class monitor
|
| Delete student |
delete INDEX…||all e.g., delete 1
|
| Edit student |
edit INDEX [n/NAME] [p/PHONE_NUMBER] [e/EMAIL] [a/ADDRESS] [t/TAG]… e.g., edit 2 n/Joseph Chan t/
|
| Find student |
find KEYWORD… e.g., find James Jake
|
| Add remark to student |
remark INDEX r/[REMARK] e.g., remark 1 r/Contracted COVID-19
|
| Set grading system |
setGrade GRADE_1[>GRADE_2]… e.g., setGrade A>B>C>D
|
| Give grade to student |
grade INDEX…||all g/[GRADE] e.g., grade 3 g/A
|
| Reset grading system | resetGrade |
| Mark student attendance |
mark INDEX…||all e.g., mark 1 2 3
|
| Un-mark student attendance |
unmark INDEX…||all e.g., unmark 1 2 3
|
| Print data as Excel file |
print [c/class] [c/phone] [c/email] [c/address] [c/tags] [c/remark] [c/attendance] [c/grade] [c/COLUMN_TITLE]… e.g., print c/class c/email c/Signature
|
| Sort students | sort name||grade |
| List students | list [all||absent] |